# Product Card
## **Product label settings**
### Labels
1. **`Enable labels`** - the setting is responsible for whether **labels (badges/tags)** will be shown on the product card. For the label to be displayed, a tag must be added to the product, for example, `label_new` is the base label that will display `NEW` with the base color. To change the type of a label, you need to add a `:type`, such as `label__new:primary` or `label__new:secondary`. The number of displayed **labels is limited to 3,** as well as a `soldout` **label** in case the product is not available;
2. For each type of **label,** there are color settings. This way you can change the color for the **label** text: `primary`, `secondary`, `base`, `soldout`;
3. The background is specified for each **label**;
4. The border color is specified for each **label**;
5. Background transparency is specified for each **label** using a range **step** range of 10%. The minimum value is **10%** and the maximum is **100%**.
You can add image labels, like this:
To do this you need add a metafield to the product.
Go to the Admin panel / Settings/ Custom data
Select “Products” metafield:
Click “**Add definition**” button:
Create a metafield with “**Badge image**” name. Check the “Namespace and key” is "**custom.badge\_image**”. Choose the “File” type, “List of values” and accept only the images.
You can add a MAXIMUM 3 logo images.
## **Product card settings**
### General
1. **`Show vendor`** - the setting is responsible for showing/hiding the product vendor;
2. **`SKU text`** - the setting is responsible for show a SKU of the product;
3. **`Enable quick view`** - the setting is responsible for enabling/disabling quick view. Otherwise, the user will need to go to the product to see other options and add to the cart;
4. **`Quick view button type`** - the setting is responsible for the appearance of the quick view button;
5. **`Show currency code`** - setting responsible for whether the **currency code** will be shown;
6. **`Enable image change on hover`** - the setting is responsible for whether the second image (video) will be shown on **hover**. By default the second product image will be used for the hover. To add an image (video), you need to add the `product_card.hover_image` **metafield**, where `product_card` is the **namespace** and `hover_image` is the **field name**. The `Content type` must be a `file`.
* If **color swatches** are disabled, then you need to add this field only to the product;
* If **color swatches** are enabled, you must also add this field to the variant;
* If **color swatches** are enabled and other options are present, for example, **size**, **material**, etc., then you need to add an image only to the first variant of each color.
7. **`Image aspect ratio`** - aspect ratio of the image. Can be “Square” or “Portrait”.
8. **`Object fit image`** - the setting is responsible for stretching the image. If **Cover(default)** is selected - the image will take all the space available for it, that is, it will stretch as much as possible, and if **Contain** - it will retain its proportions.
### Colors
1. **`Quick buttons background`** - setting allows you to specify the background color of quick buttons;
2. **`Quick buttons border color`** - setting allows you to specify the border color of quick buttons;
3. **`Quick buttons color`** - setting allows you to specify the icon color of quick buttons.
### Text button colors
1. **`Text`** - the setting allows you to set the color of the button text;
2. **`Background`** - the setting allows you to set the color of the button background color;
3. **`Border`** - the setting allows you to set the color of the button border color;
4. **`Text (hover)`** - the setting allows you to set the color of the button text on hover;
5. **`Background (hover)`** - the setting allows you to set the color of the button background color on hover;
6. **`Border (hover)`** - the setting allows you to set the color of the button border color on hover.
## **Additional information**
1. **Color swatch** settings. **Color swatches** depend on the `Color` option. The name of the color is split, and the last word is taken and substituted into the **CSS palette**. There is a chance that this color will not be in the **CSS palette**, then it will just be a white **swatch**. In this case, you must add an image to **Shopify** files of `50*50` px size in `.png` format with the `swatch-` prefix. For example, the image name for `banana-yellow` would be `swatch-banana-yellow.png`.
2. **Color swatch** settings. For example, if a user has a purely German store, whose color option is called - `Farbe`, thus the user will need to specify the name in the **swatch option** setting. The default value is `Color`.
3. **Labels settings**. For the **label** to be displayed, a tag must be added to the product, for example, `label_new` is the base **label** that will display `NEW` with the base color. To change the type of a **label**, you need to add a `:type`, such as `label__new:primary` or `label__new:secondary`. The number of displayed **labels** is **limited to 3**, as well as a **soldout label** in case the product is not available. Also you can add a 3 images label with metafields.
4. **The second image is on hover** settings. To add an image, you need to add the `product_card.hover_image` metafield, where `product_card` is the **namespace** and `hover_image` is the **field name**. The `Content type` must be a `file`, where only one file is allowed, namely an image.
* If **color swatches** are disabled, then you need to add this field only to the product;
* If **color swatches** are enabled, you must also add this field to the variant;
* If **color swatches** are enabled and other options are present, such as `size`, `material`, etc., then you only need to add an image to the first variant of each color.
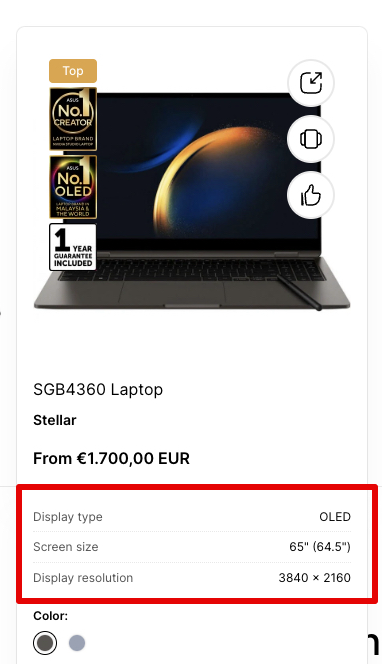
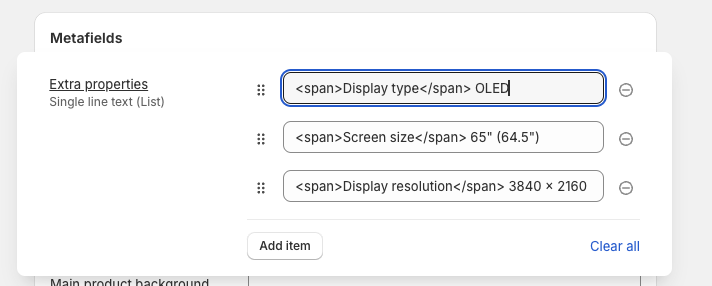
5. You can add an extra information about the product:
To do this you need to add a metafield to the product. Add to the product a metafield with a name “**Extra properties**”. Check the “Namespace and key” is "**custom.extra\_properties**”. Choose the “Single line text” type, “List of values”.
Wrap a name of the property to the `` tag. Example: ``DIsplay type`` OLED.
See the example in the screenshot:
.png?alt=media&token=2564fdd3-3a37-4e16-ab60-268f81fd3670)

.png?alt=media&token=621f06b2-124b-4d20-bbb0-7e022e183d86)
.png?alt=media&token=eaf00e8c-f189-48c5-8773-bcb825083428)
.png?alt=media&token=57703f50-f914-4f89-afdd-bee7a79c1a42)
.png?alt=media&token=249d1d28-88c1-4487-87c1-47c22b63bb19)
.png?alt=media&token=4934eddf-0a15-4d2f-b1de-5fba60977269)
.png?alt=media&token=4776d87f-c217-46c3-b99d-02d1184a0908)
.png?alt=media&token=00922ddc-59b1-4959-a8e5-e978e8e2c613)
.png?alt=media&token=ace908ea-7d16-4ebf-b1c7-f63715db9bb4)